

A quick-start guide for obtaining Microsoft products requested through Connecting Up
Have you requested Microsoft products through Connecting Up but aren't sure how to get your products? Follow the instructions in our guide.
The instructions you'll follow depend on whether your product includes Software Assurance. Microsoft products without Software Assurance will have "No Software Assurance" in the product name.
- How to Get Donated or Discounted Microsoft Products with No Software Assurance
- How to Get Discounted Microsoft Products with Software Assurance
How to Get Donated or Discounted Microsoft Products with No Software Assurance
You can use these instructions if
- You successfully placed a request for donated or discounted products without Software Assurance through Connecting Up and received an email confirming your request
- You received another email from Connecting Up with details about your products and download instructions
- You waited 24 hours after receiving the second email so that your products are ready to download
Office Download and Installation
Please note that all Office suites and individual applications, including Visio and Project, can't be downloaded directly from the Microsoft 365 admin centre.
You'll obtain your products and license keys through the Microsoft 365 admin centre, a browser-based management platform.
- Log in to the Microsoft 365 admin centre at https://admin.microsoft.com/.
- Choose Billing > Your Products in the left navigation menu.
- A list of products available for you to download appears under the Software heading. Click the product you want to download.
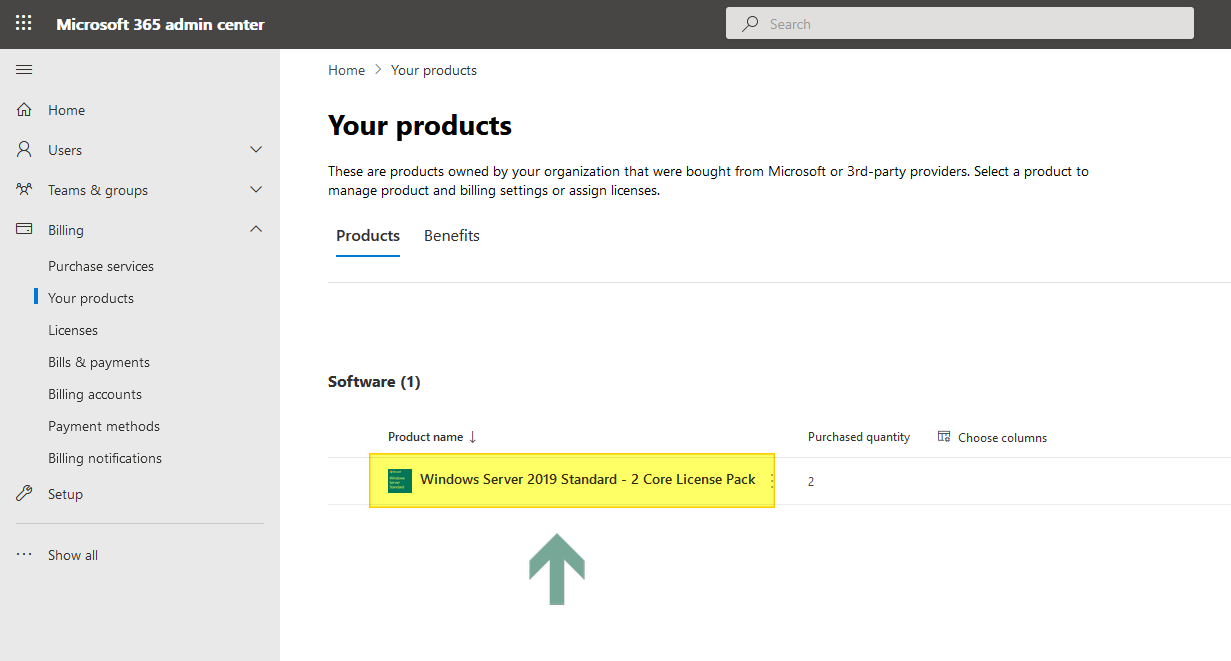
- On the download page for the product you selected, use the dropdown menus to select the appropriate Product version, Language, and CPU & file type. Then, click Download. Make sure to save the file somewhere you can access it later.

- To get your product key, click Show activation keys (next to the Download button) to reveal your key. Then, click the Copy key to clipboard and paste the key into a blank text document. Save the document somewhere you can access it later.
- To start the installation, open the setup file you downloaded in step 4 and enter the activation key when prompted. If you requested multiple licenses, you can use the same key to install the software on multiple devices.
If too much time has passed, your products might not be available to download from the Microsoft 365 admin centre. If this is the case, please contact us.
How to Get Discounted Microsoft Products with Software Assurance
You can use these instructions if you
- Successfully placed a request for a discounted Microsoft product with Software Assurance through Connecting Up and received an email confirming your request
- Received an email from Connecting Up with details about your products and download instructions
- Received an email from the Microsoft Volume Licensing Service Center (VLSC) after your request was approved notifying you that your license agreement is ready.
- Step One: Register at the VLSC
- Step Two: Accept Your Agreement
- Step Three: Download Your Requested Software
- Step Four: Burn Your Software to a Disc
- Step Five: Install it!
Step One: Register at the VLSC
The VLSC is an online tool for managing Microsoft Volume Licensing agreements, downloading products, and accessing volume license keys.
Before you can download and install the software you requested, you'll need to register and accept your agreement at the VLSC.
If this isn't your first request and you've already registered at the VLSC, skip to Step Two.
To register at the VLSC
- Go to the VLSC at https://www.microsoft.com/licensing/servicecenter.
- Click Sign In.
- If sign-in options are presented, choose to sign in with a Work Account.
- You will be asked to enter your email address. Enter your organisation's email address that is registered with Connecting Up and follow the on-screen instructions.
- You will receive an email that welcomes you to the Volume Licensing Service Center and asks you to validate your information. Wait at least 15 minutes and then click the link in this email to validate your email address. You'll need to wait at least this long because there is a lag before the VLSC makes the terms and conditions available.
You can also watch a video from Microsoft to learn how to register.

Step Two: Accept Your Agreement
After you click the link in the welcome email to validate your email address, you should be signed in on the VLSC website. If not, simply go to the VLSC and sign in before proceeding.
You'll be prompted to sign and accept the terms and conditions of the Open License Agreement.
You'll need to accept a new agreement each time you place a product request for Microsoft software.
To accept the agreement terms
- Select the following options and then click Display.
- Open License Type: Charity
- Country of Usage: Your country
- Language: Your preferred language
- Review the Open License Agreement, enter your name, and click I Accept.
If you aren't immediately prompted with the terms and conditions on the VLSC, It might take up to 48 hours for access to be granted. Keep the validation email and click the link in it again after a 48-hour period.
Step Three: Download Your Requested Software
Office Download and Installation
Please note that all Office suites and individual applications, including Visio and Project, can no longer be downloaded directly through the VLSC.
To receive the Office product you've requested, follow our detailed instructions to download and install Office products obtained through Connecting Up. If you need help upgrading, you can get low-cost installation support.
To download your software (does not apply to Office suites and individual applications)
- If you haven't already, sign in to the VLSC.
- Choose Downloads and Keys from the navigation bar. The Downloads and Keys page appears, showing all products in your request, grouped by families.
- Find the specific product you want to download. You can download the current or previous version of any product you request through Connecting Up on the VLSC.
- Click the Download link associated with that product.
- Select your download method, language, and operating system type if applicable (32-bit or 64-bit). You can choose any version or language of a product that's available. You can use either Microsoft's recommended download manager or your web browser for the download. Click Continue.
- Click the Download down arrow icon that appears under your product listing.
- If you are using your web browser to download your software, the Save As dialog box appears. Specify your location and click Save to start the download. Repeat as needed for other download files.
- If you are using the download manager, the application opens, and the download begins. The download manager displays the progress and status at the top of the window. You can click Pause at any time to pause the download operation. You can restart the download manager and click Resume at a later time.
For server products that require setup codes for installation, the codes appear on the VLSC download page after the download is complete.
You can also watch this video from Microsoft to learn how to download your requested software.

Step Four: Burn Your Software to a Disc
The files downloaded from the VLSC have the file extension .iso. An ISO file downloaded from the VLSC is a copy of the installation CD or DVD. The simplest method is to burn this file to a DVD using a DVD writer. Most Microsoft applications don't fit on a CD and require DVD.
Don't have a DVD writer or prefer to use another method? See this article for additional options.
To burn your ISO file to a disc for easy installation
- Insert a recordable DVD into your disc burner.
- In Windows 8 or 10, right-click the ISO file and select Burn disc image. Mac users, follow these instructions.
- Verify that the correct drive is listed under Disc burner. If not, change it.
- Check the box next to Verify disc after burning and click Burn to begin writing the disc.
If you don't see the option to Burn disc image in step 2, you might have other disc writing software installed. You can simply use that disc writing software instead, or you can use the Windows burner by changing the default disc writing program. To do that, right-click the ISO file and select Open with, and then select Choose default program. Then, assign it to Windows Explorer to make Burn disc appear as a right-click option.
Step Five: Install It!
After you burn the ISO file to DVD, insert the DVD in any computer to start the setup. You can install the software on as many computers as you've requested licenses. For example, if you request two licenses, you can install the product on two computers. If you didn't request enough licenses, you can request additional licenses through Connecting Up as long as you don't exceed Microsoft's product request limits.
You'll probably need your product key to activate the products during installation (most license-only products do not require keys or codes for setup). There are two types of keys you can choose from for Volume Activation: a Multiple Activation Key (MAK) and a Key Management Service (KMS) key. The MAK is the simplest option and is the type of key provided by default for licenses requested through Connecting Up. You'll enter this key on each computer where you install the software.
To get your key
- Sign in to the VLSC.
- Choose Downloads and Keys.
- Find your product in the list and click its Key link.
- In the table beneath the name of the product, get your key from the column labelled Key.
- The Type column shows whether the key is MAK or KMS.
- Some products like Office have separate setup keys for online functionality like web apps. These keys are not the same as the MAK or KMS product keys and cannot be used for Volume Activation of desktop products.
- For products that don't require a key, the Product Keys field reads: "This product does not require a product key."
- You can copy individual keys from this table or click Export all keys: CSV just above the list of products to download a list of keys in comma-separated-values format (which can be opened with Excel). This list contains all Volume License Keys associated with agreements in your VLSC profile.

Learn about other types of keys and activation options if you are installing software on many computers on a network in Microsoft's Product Keys FAQ.